How do I change the primary IP address?
How do I change the primary IP on the server?
In order to change the main IP address, you need to change the settings in the OS settings. This may be necessary when cloning the server.
Connect to the server via VNC, go to the /etc/sysconfig/network-scripts/ directory and edit the ifcfg-eth0 file:
cd /etc/sysconfig/network-scripts/
vi ifcfg-eth0
To start editing a file, press the i key
In the file, we change the following parameters:
GATEWAY=109.234.39.1
IPADDR=109.234.39.10
IPADDR (IP address) and GATEWAY (Gateway) specify our own, they can be seen immediately in VNC or in the IP tab of the server parameters.
Attention! If the server is being created from a backup, then remove the HWADDR line containing the MAC address if it is in the configuration file.
After editing the file, exit the vim editor - press CTRL+C and enter the command ZZ or :wq!
Restart the network service using the command:
service network restart
If everything is done correctly, the IP will become available in an instant.
Connect to the server via VNC, go to the /etc/sysconfig/network-scripts/ directory and edit the ifcfg-ens3 file
cd /etc/sysconfig/network-scripts/
vi ifcfg-ens3
To start editing a file, press the i key
In the file, we change the following parameters:
GATEWAY=109.234.39.1
IPADDR=109.234.39.10
IPADDR (IP address) and GATEWAY (Gateway) specify our own, they can be seen immediately in VNC or in the IP tab of the server parameters.
Attention! If the server is being created from a backup, then remove the HWADDR line containing the MAC address if it is in the configuration file.
After editing the file, exit the vim editor - press CTRL+C and enter the command ZZ or :wq!
Restarting the network interface:
ifdown ens3; ifup ens3
If everything is done correctly, the IP will become available in an instant.
Connect to the server via VNC, go to the /etc/sysconfig/network-scripts/ directory and edit the ifcfg-eth0 file:
cd /etc/sysconfig/network-scripts/
vi ifcfg-eth0
To start editing a file, press the i key
In the file, we change the following parameters:
GATEWAY=109.234.39.1
IPADDR=109.234.39.10
IPADDR (IP address) and GATEWAY (Gateway) specify our own, they can be seen immediately in VNC or in the IP tab of the server parameters.
Attention! If the server is being created from a backup, then remove the HWADDR line containing the MAC address if it is in the configuration file.
After editing the file, exit the vim editor - press CTRL+C and enter the command ZZ or :wq!
Restarting the network service:
service network restart
If everything is done correctly, you can connect to the server via SSH.
Next, replace the IP address in the settings of the other services by running the following commands:
grep -lr "СТАРЫЙ-IP" /home/*/conf /etc/ /usr/local/vesta/data/users/ | xargs -l perl -pi -e "s/СТАРЫЙ-IP/НОВЫЙ-IP/g"
mv /etc/httpd/conf.d/СТАРЫЙ-IP.conf /etc/httpd/conf.d/НОВЫЙ-IP.conf
mv /etc/nginx/conf.d/СТАРЫЙ-IP.conf /etc/nginx/conf.d/НОВЫЙ-IP.conf
mv /usr/local/vesta/data/ips/СТАРЫЙ-IP /usr/local/vesta/data/ips/НОВЫЙ-IP
Restarting the server:
reboot
We connect to the server via VNC and make changes to the /etc/network/interfaces file:
vi /etc/network/interfaces
Please note the name of our network interface, it is indicated in the lines:
allow-hotplug ens3
iface ens3 inet static
In our case, this is ens3.
iface ens3 inet static
        address 109.234.39.10
        gateway 109.234.39.1
To start editing a file, press the i key
Instead of ens3, specify the name of your network interface, address and gateway specify our own. If the server is being created from a backup, then remove the line containing the MAC address if it is in the configuration file.
The IP and gateway can be seen immediately in VNC or in the IP tab of the server settings.
After editing the file, exit the vim editor - press CTRL+C and enter the command ZZ or :wq!
We reboot the network service and in a moment we will be able to access the new IP.
/etc/init.d/networking restart
We connect to the server via VNC and make changes to the file /etc/netplan/01-netcfg.yaml
vi /etc/netplan/01-netcfg.yaml
To start editing a file, press the i key
Changing the addresses (IP address) and gateway4 (Gateway) parameters. If the server is being created from a backup, then remove the line containing the MAC address if it is in the configuration file.
      addresses: [ 94.103.83.39/24 ]
      gateway4: 94.103.83.1
The IP and gateway can be seen immediately in VNC or in the IP tab of the server settings.
After editing the file, exit the vim editor - press CTRL+C and enter the command ZZ or :wq!
Checking for errors:
netplan try
If there are no errors, then apply the settings by pressing Enter.
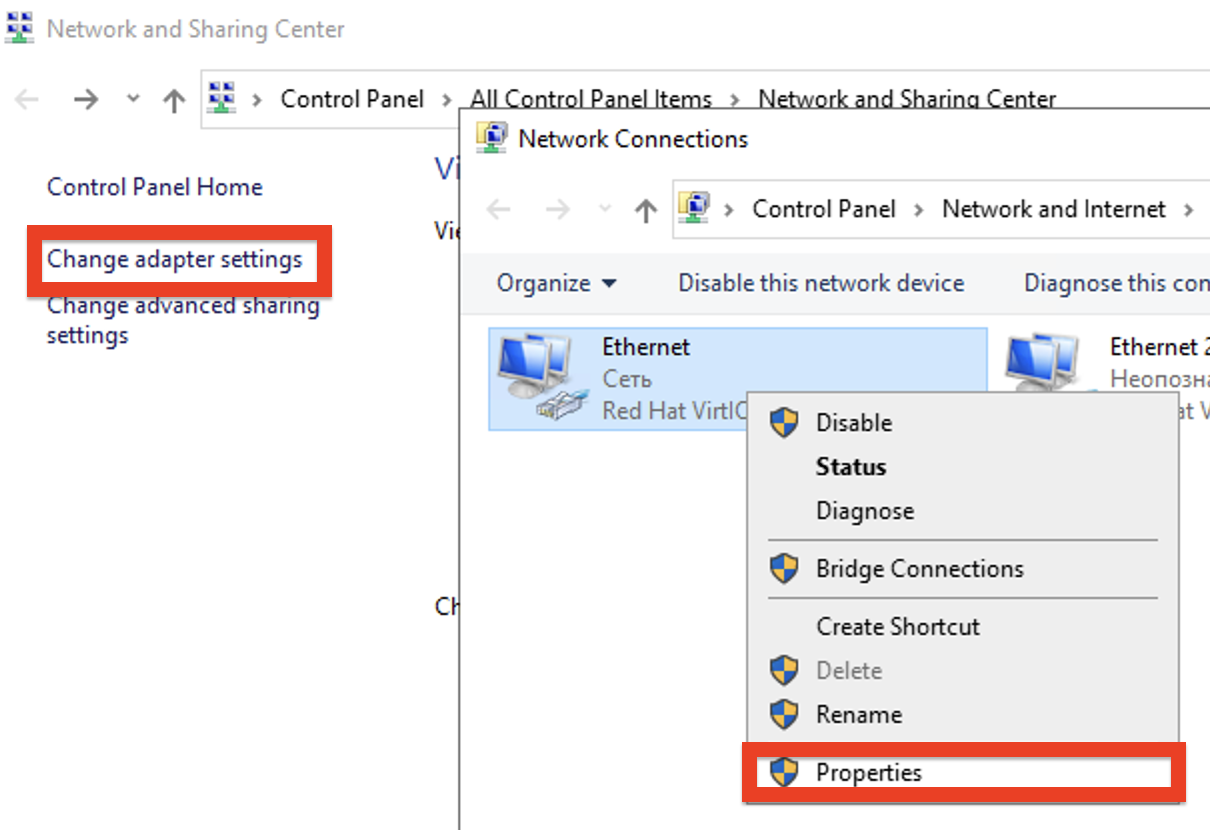
Open the Control Panel -> Network and Sharing Control Center, select Change adapter settings:

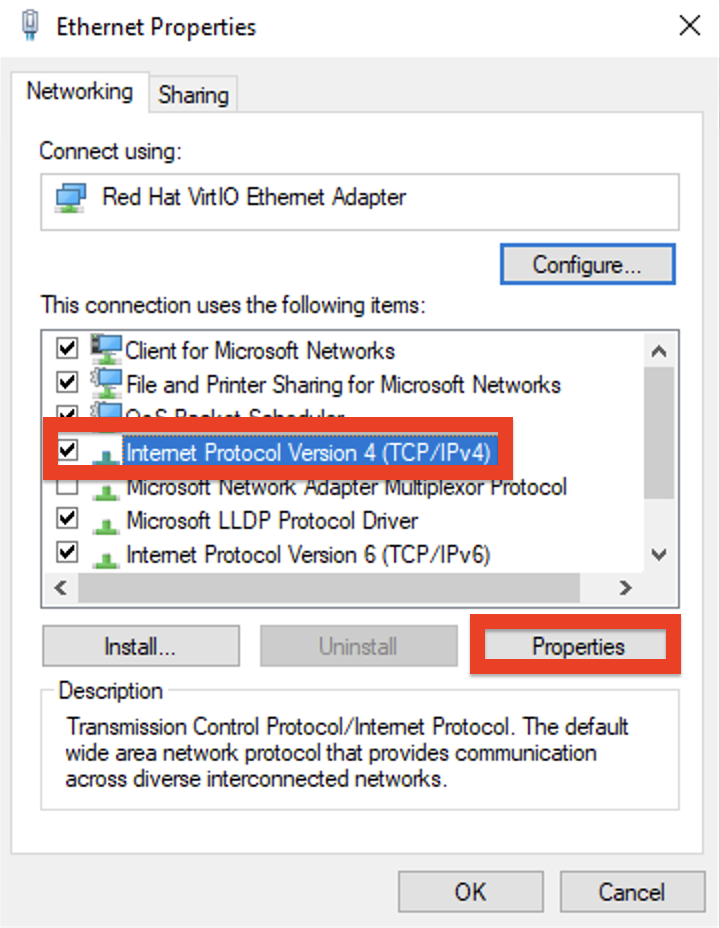
Right-click on the existing connection and select "Properties". Next, select "Internet Protocol version 4 (TCP/IPv4)" and click on the "Properties" button again:

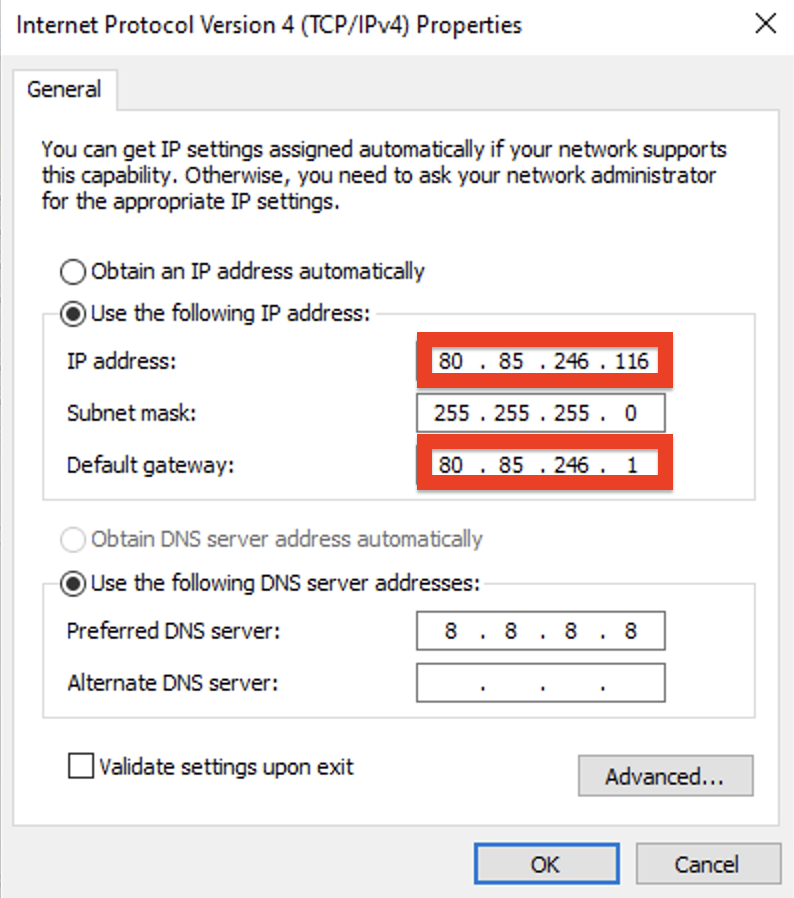
In the window that appears, specify the new IP and gateway.
The IP and gateway can be seen immediately in VNC or in the IP tab of the server settings.


